本來是要在上次連假時發佈,但是後來接期中考,就被我放置到現在了 是時候要讓 angular 系列先告一個段落了 這將會是目前 angular 系列的最後一個主題
這篇主要會說明在 Angular 中蠻重要的部份,Injectable 最後會實做一個簡單的 Service 從後端取資料到前端
Injectable
Inject 一詞意思為注入 而 Injectable 則是可注入的 在講 Injectable 主體之前,要先講到所謂的依賴注入
依賴注入 (Dependency Injection)
先來看一下維基百科裡對 dependency injection 的定義
In software engineering, dependency injection is a technique in which an object receives other objects that it depends on. These other objects are called dependencies. In the typical “using” relationship the receiving object is called a client and the passed (that is, “injected”) object is called a service.
依賴注入,是將某個物件依賴的其他物件,傳遞 (注入) 進來的技術 被傳遞 (注入) 進來的物件稱為 service,而使用這些 service 本身的物件稱為 client
依賴注入可以降低物件之間的耦合 由於是建構時注入,而非直接依賴 因此程式本身容易修改,結構不容易被破壞
Injectable 結構
Angular 本身有自己的依賴注入方式
一個可注入的服務會經過裝飾器 Injectable 的修飾
@Injectable({
  providedIn: 'root',
})-
provideIn: 被提供者,可選參數 有給種類型:root應用程式級別的注入器,整個應用程式都可以注入platform整個頁面的應用程式共享的注入器,注入的是相同實例 (Singleton)any延遲載入的模組擁有獨立的實例,即時載入的則共享實例
通常由
ng generate建立的默認都是root
其他注入形式
可以只對 module 級別或是 component 級別的類別來進行注入
Module 級別的注入
在經過 NgModule 修飾的時候加入新的參數 providers 即可
@NgModule({
  	// ...
  	providers: [
   		SomeService
 	],
 	// ...
})
module 與其底下的類別將可以注入 SomeService
Component 級別的注入
跟 NgModule 差不多,一樣在 Component 修飾時加入新的參數 providers
@Component({
    // ...
	providers:  [ SomeService ]
    // ...
})
實例 - UserService
這邊將會透過產生一個 UserService 來展示 Injectable 的使用方法
事前準備
- 服務端 : 這邊我使用 flask + flask_CORS 來建立一個可以跨域存取的 WebAPI 建在 localhost:8888
- 資料庫 : 使用 sqlite 來讀取或新增使用者的資料
公開 API
- GET /user 取得所有用戶資訊
- POST /user 新增用戶
- DELETE /user/< id > 刪除用戶
建立 Service
使用下列指令建立 UserService
ng generate service user/user這邊採用
user/user的路徑是為了將它放到user資料夾底下 後面的user則是 service 的名稱
然後就會看到下列的程式
import { Injectable } from '@angular/core';

@Injectable({
  providedIn: 'root'
})
export class UserService {
}
引用 HttpClient
為了使用這些 WebAPI 進行操作,須要發送 http request
可以使用 angular 內建的 HttpClient
引入 HttpClient 前,要先確認已經在要使用的模組內引入 HttpClientModule
由於一個應用程式可能會有多時候需要發送 http request
因此建議將它加到 AppModule 內
然後在程式上方引入 HttpClient
import { HttpClient } from '@angular/common/http'RXJS
RXJS 是一個響應式設計的函式庫
HttpClient 操作後會回傳一個 Observer
而 Observer 正是 RXJS 的類別之一
但是 RXJS 並非這次的主題,加上我在這方面也是新手而已,因此這邊將不會介紹 RXJS 的相關內容
有關 angular 的 RXJS,可以參照:Angular - The RxJS library
撰寫 Service
引入了 HttpClient 之後
接著就開始撰寫 Service 本身
首先根據前面的三個 API 撰寫對應的內容
@Injectable({
  providedIn: 'root'
})
export class UserService {
  static readonly API='http://127.0.0.1:8888'

  constructor(private http: HttpClient) { }

  /**
   * 取得所有用戶資訊
   */
  getUsers() {
    return this.http.get<any>(`${UserService.API}/user`, {
      observe: 'response',
      responseType: 'json'
    });
  }

  /**
   * 新增用戶
   *
   * @param user 用戶資訊
   */
  addUsers(user: any) {
    return this.http.post<any>(`${UserService.API}/user`, user, {
      observe: 'response',
      responseType: 'json'
    });
  }

  /**
   * 刪除用戶
   *
   * @param userId 用戶id
   */
  delUser(userId: any) {
    return this.http.delete<any>(`${UserService.API}/user/${userId}`, {
      observe: 'response',
      responseType: 'json'
    });
  }
}
裡面對 http 的任何操作,都會回傳一個 Observer 的實例
get、delete、post、put 等方法的泛型表示的是回傳資料型別
這邊稍微偷懶一下,都用 any 來跳過型別檢查
HttpClient 的 request 操作最後一個欄位可以設定一些額外參數
observeObservable的類型,這邊使用response表示回傳的是一個HttpResponse的物件,資料為前面指定的anyresponseType回應的資料類型,這邊使用json做為 http response 的資料型態
! [WARNING]
注意 HttpClient 的 post 跟 put
HttpClient的 post 跟 put 傳送的資料並非欄位,而是 json 的形式 因此服務端接收時要注意一下,並妥善處理
http 函式的資料型態指定
由於最一開始使用建立 angular 時是使用嚴格模式 因此再生成網站時會進行型別檢查 要繞過的話必須要使用 any 來確定它可以接受任何型別
不加型態的相關方法沒辦法在嚴格模式下使用
使用 Service
這邊會透過之前已經建立好的 UserComponent 來引入 UserService
首先將 UserService import 進來
import { UserService } from './user.service'然後直接在建構式裡引入 UserService
export class UserComponent implements OnInit {
    // ...
	constructor(private userApi: UserService) { }
    // ...
}
接著為這個類別設計一個簡陋的畫面
<table border='1'>
    <tr>
        <th>ID</th>
        <th>名稱</th>
        <th>性別</th>
        <th>年齡</th>
        <th>生日</th>
        <th>操作</th>
    </tr>
    <tr *ngFor='let i of users' style='text-align:center'>
        <td>{{ i.rowid }}</td>
        <td>{{ i.name }}</td>
        <td>{{ i.gender }}</td>
        <td>{{ i.age }}</td>
        <td>{{ i.birthday }}</td>
        <td><button (click)="delUser(i.rowid)">刪除</button></td>
    </tr>
</table>
<p>{{ result }}</p>
 Add User <button (click)="addUser()">Add</button>
 <table>
     <tr>
         <td>name</td>
         <td><input [value]='name' (input)='name = nin.value' #nin></td>
     </tr>
     <tr>
         <td>gender</td>
         <td><input [value]='gender' (input)='gender = gin.value' #gin></td>
     </tr>
     <tr>
         <td>age</td>
         <td><input [value]='age'  (input)='age = ain.value' #ain></td>
     </tr>
     <tr>
         <td>birthday</td>
         <td><input type='date' [value]='birthday'  (input)='birthday = bin.value' #bin></td>
     </tr>
 </table>
<router-outlet></router-outlet>
畫面結果如下圖所示:
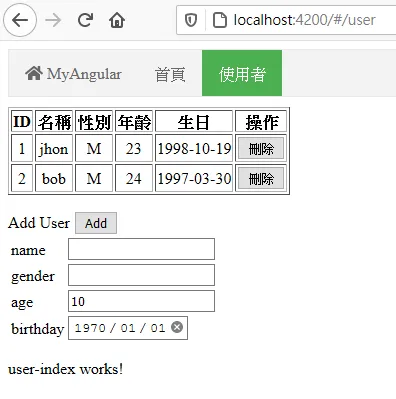
上方的 table 會列出從伺服器掃到的所有用戶資訊,並提供刪除按鈕
刪除按鈕會呼叫 delUser 來刪除用戶
下方有一個簡陋的表單,可以新增使用者 每個 input 欄位都綁定一個變數,發生變化時也會即時修改變數內容
按下 Add 按鈕時,將表單的內容透過 addUser 發送 POST 到服務端來新增用戶資料
Component 最終的程式內容如下:
import { Component, OnInit } from '@angular/core';
import { UserService } from './user.service'

@Component({
  selector: 'app-user',
  templateUrl: './user.component.html',
  styleUrls: ['./user.component.css']
})
export class UserComponent implements OnInit {

  users: {
    rowid: any;
    name: any;
    gender: any;
    age: any;
    birthday: any;
  }[] = new Array();
  name: string = "";
  gender: string = "";
  age: string = '10';
  birthday: string = "1970-01-01";
  result: string = '';

  constructor(private userApi: UserService) { }

  ngOnInit(): void {
    this.updateUsers();
  }

  updateUsers() {
    this.userApi.getUsers()
    .subscribe(res => {
      console.log(res.body)
      if (res.status == 200) {
        this.users = res.body.data ?? [];
      }
    });
  }

  addUser() {
    this.userApi.addUsers({
      name: this.name,
      gender:this.gender,
      age: this.age,
      birthday: this.birthday
    })
    .subscribe(res => {
      this.result = res.body.message;
      if (res.status == 200) {
        this.updateUsers()
      }
    });
  }

  delUser(id: any) {
    this.userApi.delUser(id)
    .subscribe(res => {
      this.result = res.body.message;
      if (res.status == 200) {
        this.updateUsers();
      }
    });
  }
}
其中的 updateUser 為更新列表的函式,會發送一個 request 到伺服器取回用戶列表
上面的程式碼中你可以注意到,當呼叫了 userApi 裡面的函式後,回傳時變立即使用了 subscribe 函式
前面說過 HttpClient 的結果是一個 Observable
Observable 物件透過 subscribe (訂閱) 來執行內容
裡面需要先丟一個回調函式 (callback) ,之後會把內容回傳回來
由於前面回傳的類型是 Response<any> ,因此這邊接收到的也會是 Response<any>
透過 http 的狀態碼來辨別操作使否成功 (http 狀態碼的輸出也是由服務端來定義)
成功會就進行相對應的操作

完成之後就可以進行簡單的新增與刪除了
後記
最初寒假學習 angular 時,其實都沒想到最後會跑來寫這一系列
老實說也因為寫得太早,還沒有時間好好消化內容,就出來誤人子弟
原本只打算在建置環境時才使用 win10 虛擬機 但後來想想,既然都架環境了,那就乾脆用下去吧,於是之後所有的內容都是在 win10 虛擬機上完成的
Injectable、Service 這篇因為拖太久才開始寫,寫了之後又被我放置至今
這篇的內容其實也沒什麼,比較重要的部份反而是在 HttpClient 上
為了能夠有一個比較 “完整” 的網頁,所以我選擇建立一個要從後端取資料的 Service 來介紹這個主題
裡面雖然有提及 RXJS,但是只是稍微敘述一下,我自己也沒辦法講太多,不然會離題 我在 RXJS 和 Angular 上是個初學者,沒辦法提供很深入的內容也是原因之一 不過這些文章本來也就只是作為自己筆記而已,在寫的過程中複習自己看過的、練習過的內容 發現不知道怎麼描述的地方,就去翻官方文件理解官方設計這個類別的涵義
Injectable、Service 本來就是作為整個 angular 系列一個段落的結束 其實到這邊我想也差不多了,應該可以用這些元素這個建置一個簡單的網站 也有了取得後端資料的途徑 (HttpClient),所以沒打算繼續介紹下去 後面還有像是 Guard 之類的內容,目前就不會去介紹,那些其實我也只有看過,都還沒寫過
最後針對這篇最初引用的 IT邦鐵人賽文章:Angular 深入淺出三十天 我覺得這篇內容還不錯,還包含以 angular 建立一個網頁的內容,裡面講了許多 angular 的關鍵類別跟用法 自己看這篇其實算是看得蠻順的,最初也是照著這篇教學一步一步深入 angular
angular 筆記在此就先告一個段落
如果有寫得不好,或是有錯誤的地方,歡迎透過下方的 gitalk 提出